
Checker Board Build
A simple veneering project with dramatic results.
Tools needed:
Sharp knife
Heavy straight edge
Ruler
Thin Air Press
Materials Needed:
Selection of veneers
Masking tape
Glue
Substrate material
Board size
You need to decide what size you want your checkerboard to be. I chose 1.5 inch squares for this tutorial. You may want to build it larger. Typically, a size between 1.5″ to 2″ works the best.
Choosing the veneers
Choose two types of veneer with distinctly different colors or patterns.
Cutting your Veneer
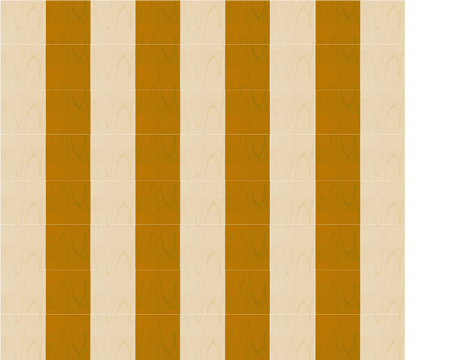
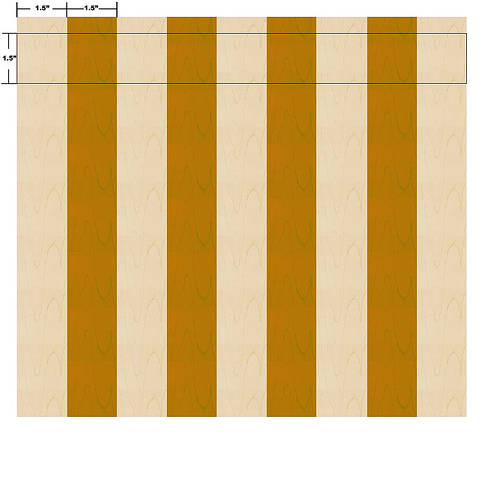
Once you have chosen your veneers, cut equal sized lengths at the width you have decided on for your squares. In this case I want to have 1.5″ squares. The cut length of your veneer pieces should be an inch longer than your finished checker set. My veneer pieces will be 13″ long by 1.5″ wide. The excess material will be trimmed off later. In total there will be 9 pieces of veneer you will need to cut, 5 will be a light color and 4 will be a dark color.
Select a nice piece of veneer and make a lengthways cut at least 13 inches long. Use a heavy straight edge and a very sharp knife, keeping the knife as straight as possible. To prevent any tearing or ripping while making your cut, lay a piece of masking tape on top the veneer along the length of the cut. Remember to make light cuts. Do not try to cut all the way through the veneer in one slice.
Once you have made a clean straight cut, use a ruler to set your second cut 1.5″ from the first. Move your straight edge to aproximately 1.5″ from your first. Align your ruler at 90 degrees to the straight edge and adjust the edge to exactly 1.5″ from your first cut. Do this top and bottom of your piece of veneer. Once the straight edge is perfectly aligned top and bottom to 1.5″, make your second cut. You should now have a single piece that is at least 13″ long by 1.5″ wide. You can use this piece as a template, to adjust your straight edge to cut the remainder of your pieces. It is important to cut all the pieces at exactly 1.5″. Cut 5 light and 4 dark colored pieces of veneer in this way.
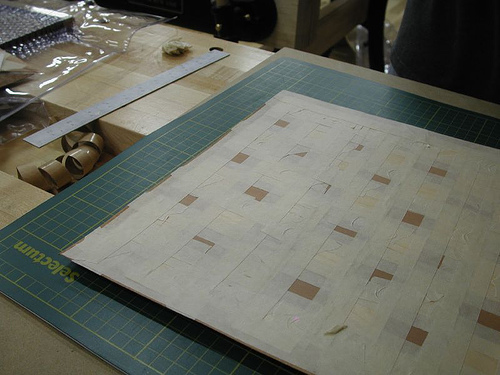
Using masking tape on one side only, join the light and dark pieces together. I stretch 3 or 4 2″ pieces of masking tape across the alternating veneers, then a length of tape over top of the seam.
Repeat this step to all 9 pieces of veneer. You project will look like this:
Now rotate your project 90 degrees and align your straight edge 90 degrees to the horizontal stripes. Make a clean, straight cut 1/2″ in from the edge of your project. Move the straight edge exactly 1.5″ over using a ruler and make your second cut. Repeat this step using the cut strip as a template, for the remainder of your pieces. When you are finished, you will have 8 pieces, exactly 1.5″.
Masking tape these pieces together in the same way you did the strips. Remember to offset each strip by one of the squares. If you did an accurate job cutting your veneers, all the squares should align perfectly.
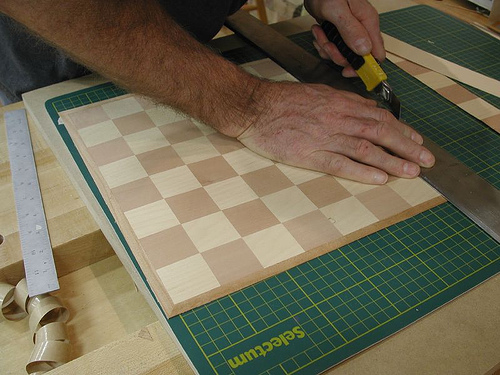
I added a border to my veneered checker board. You can do this by cutting 4 strips 1/2″ to 1/4″ wide.
Miter one end of each of the cut pieces then tape one of the pieces to the edge of the checker.
Fit the second piece to the next edge and cut the miter to fit. Repeat this to all 4 sides.
You will end up with a taped form that should look something like this:
Selecting your substrate material
Ther are many choices available, depending on your project. Veneering over solid wood, birch plywood and MDF are all materials you can use. I chose MDF for this project.
Prep your Workspace
It is time to prepare your workspace for pressing. There are many ways to press your veneers onto your substrate material. Cauls and clamps work well. You can invest in an electric vacuum pump and bag system for vacuum veneering or you can use the Thin Air Press kit from Roarockit. Whatever you use, make sure you are familiar with the process before proceeding. Doing a dry run, without glue is always advisable when pressing veneers. Have all your materials and tools prepared and ready, including the glue, veneer, roller, (in this case) the Thin Air Press vacuum bag, breather netting and finally, the manual vacuum pump. Make sure you have everything close at hand when you begin your glue up as you have limited time for applying the glue before it starts to dry.
What glues to use
There are many types of glue that you can use for veneering. You want a glue that advertises a long wet time. Epoxy glues (like West System) work well and have the advantage of not swelling the veneers like water-based glues. Unfortunately, epoxy is fairly pricey and toxic smelling while curing. Water-based glues, like woodworker’s glue, work well for veneering but special consideration has to be taken for veneers expanding because of the water in the glues. I use Titebond III as it has a 9 minute wet time and is waterproof after curing. A quality polyurethane glue will also work for this project.
Apply an ample amount of glue to the substrate material only. Do not apply glue to your checker board veneer as it will curl and will be difficult, if not impossible, to work with. I use a short napped roller to evenly apply glue over the entire surface of the substrate. A thick build up in only one area will cause the veneer to pucker while pressing – an even coat is a must! After applying the glue, place your taped veneer checkerboard , tape side up, onto the glued substrate. Align the veneer so there is no overhang

Quickly place the veneered substrate into the Thin Air Press bag.
Place the supplied breather netting overtop of the veneer. This material allows for even evacuation of the air from the TAP bag while pressing.
Make sure that your project is centered in the bag.

Peel the paper from the sealing tape and pull firmly on either side of the TAP bag, stretching the bag flat along the sealing tape. Take your finger and carefully press the sealing tape to the vinyl TAP bag. As you do this, try to work from the inside of the bag towards the outside. Look for any light colored areas where the tape is not firmly pressed down. They will be very visible and only need a little thumb pressure to remove them.

You are now ready to pump the air from the TAP bag. Because the form inside the bag is flat it should take less than 30 seconds of fairly vigorous pumping with the TAP kit’s manual vacuum pump. You will feel when you have achieved maximum vacuum as the handle on the pump will be harder to pull and you will be unable top pull the vinyl away from your project. This will create over 13 lbs per square inch. With a project this size there will be over 2600 pounds of pressure evenly pressing down on the veneers. This is more than enough pressure to press any veneered project.

In a few minutes, check by pulling at the edge of the vinyl to see if you have any leaks. If the vinyl pulls away from your project, inspect the sealing tape for any light colored areas where the tape is not firmly pressed against the vinyl and use your thumb to press these out, then re-pump your TAP bag. The process is very simple and if you follow the basic instructions the TAP bag will maintain vacuum for as long as it takes your glue to dry. I leave a project like this in the TAP bag for at least 4 hours. Check to see what the glue instructions say to be sure, as some glues take longer than others to set.
Removing your project
After the glue has dried you can remove your project. The paper strip that you took off the sealing tape should be replaced as soon as you open your bag and before you remove your project. This will prevent any flakes of glue from getting onto the sealing tape. The sealing tape is re-usable many times over as long as you keep it clean.

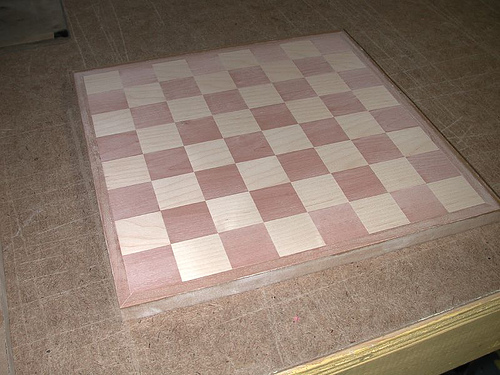
Here is an example of an almost-finished piece. You can get even more complicated with your veneer work than I did, once you learn the basic steps. It took about 45 minutes to cut and tape this project together. It was a fun project and the results look great when completed!
Ted Hunter
 Thin Air Press Kit 26x28"
 Titebond III glue (1 gallon)